https://spring.io/projects/spring-security#overview
https://docs.spring.io/spring-security/reference/index.html
Spring Security integrates with the Servlet Container by using a standard Servlet Filter. This means it works with any application that runs in a Servlet Container.
Spring Security, with first class support for securing both imperative and reactive applications, is a framework that provides authentication, authorization, and protection against common attacks.
Spring Security 的过滤器链的顺序非常重要,因为每个过滤器依赖于前面的过滤器执行特定的功能,才能实现整体的安全控制。
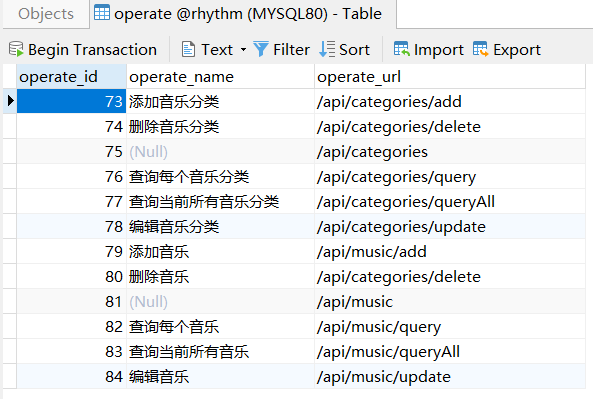
数据库设计
首先要自定义FilterInvocationSecurityMetadataSource 通过FilterInvocationSecurityMetadataSource接口中的getAttributes方法来确定一个请求需要哪些角色,
1
2
3
4
5
6
7
8
9
10
11
12
13
14
15
16
17
18
19
20
21
22
23
24
25
26
27
28
29
30
31
32
33
34
35
36
37
38
39
40
41
42
43
@Component public class PermissionAuthority implements FilterInvocationSecurityMetadataSource { @Resource private RoleMapper roleMapper; @Override public Collection<ConfigAttribute> getAttributes (Object object) throws IllegalArgumentException { String requestUrl = ( (FilterInvocation) object ).getRequestUrl(); List<Role> roleList = roleMapper.getListByOperateUrl(requestUrl); if ( !roleList.isEmpty() && roleList.size() > 0 ){ String[] roles = new String [roleList.size()]; for ( int i = 0 ; i <= roles.length - 1 ; i++ ){ roles[i] = roleList.get(i).getRoleName(); } return SecurityConfig.createList(roles); } return SecurityConfig.createList("PublicPermission" ); } @Override public Collection<ConfigAttribute> getAllConfigAttributes () { return null ; } @Override public boolean supports (Class<?> clazz) { return FilterInvocation.class.isAssignableFrom(clazz); } }
AccessDecisionManager 当一个请求走完FilterInvocationSecurityMetadataSource中的getAttributes方法后,接下来就会来到AccessDecisionManager类中进行角色信息的比对,
1
2
3
4
5
6
7
8
9
10
11
12
13
14
15
16
17
18
19
20
21
22
23
24
25
26
27
28
29
30
31
32
33
34
35
36
37
38
39
40
41
42
43
44
45
46
47
48
49
50
51
52
@Component public class PermissionValid implements AccessDecisionManager { @Override public void decide (Authentication authentication, Object object, Collection<ConfigAttribute> configAttributes) throws AccessDeniedException, InsufficientAuthenticationException { for ( ConfigAttribute attribute : configAttributes ){ if (authentication == null ) { throw new AccessDeniedException ("权限认证失败!" ); } String needRole = attribute.getAttribute(); System.out.println( "-------开始认证-------" ); if ("PublicPermission" .equals(needRole)) { if (authentication instanceof AnonymousAuthenticationToken) { throw new BadCredentialsException ("未登录" ); } else return ; } Collection<? extends GrantedAuthority > authorities = authentication.getAuthorities(); for (GrantedAuthority authority : authorities) { if (authority.getAuthority().equals(needRole)) { return ; } } } throw new AccessDeniedException ("权限认证失败!" ); } @Override public boolean supports (ConfigAttribute attribute) { return true ; } @Override public boolean supports (Class<?> clazz) { return true ; } }
public class AdminServiceImpl extends ServiceImpl<AdminMapper, Admin> implements AdminService { http://127.0.0.1:8001/hello 启动项目,访问/hello接口会自动跳转到登录页面,这个登录页面是Spring Security预定义
spring security 过滤器链 过滤器顺序 Spring Security 的过滤器链是一系列过滤器的有序组合,每个过滤器负责处理特定的安全功能。过滤器链的顺序在安全处理过程中非常关键,因为每个过滤器依赖之前的过滤器执行其功能。当配置 Spring Security 的过滤器链时,理解和管理过滤器的顺序对于确保正确的安全行为至关重要。
过滤器链的默认顺序 Spring Security 有默认的过滤器顺序,这些过滤器按照严格的顺序排列,以下是常用的过滤器及其顺序:
ChannelProcessingFilter
确保请求使用正确的通道(HTTP 或 HTTPS)。
WebAsyncManagerIntegrationFilter
SecurityContextPersistenceFilter
管理 SecurityContext 的生命周期。
HeaderWriterFilter
CsrfFilter
LogoutFilter
UsernamePasswordAuthenticationFilter
DefaultLoginPageGeneratingFilter
BasicAuthenticationFilter
RequestCacheAwareFilter
SecurityContextHolderAwareRequestFilter
使 SecurityContext 可用作请求属性。
AnonymousAuthenticationFilter
SessionManagementFilter
ExceptionTranslationFilter
FilterSecurityInterceptor
调整过滤器顺序 你可以使用 HttpSecurity 提供的方法将自定义过滤器插入到过滤器链的特定位置:
addFilterBefore(Filter filter, Class<? extends Filter> beforeFilter)
addFilterAfter(Filter filter, Class<? extends Filter> afterFilter)
addFilterAt(Filter filter, Class<? extends Filter> atFilter)
/**
 * 配置 JWT 过滤器
 */
http.addFilterBefore(jwtRequestFilter, UsernamePasswordAuthenticationFilter.class);
1
2
3
4
5
6
7
8
9
10
11
12
13
14
15
16
17
18
19
20
21
22
23
24
25
26
27
28
29
30
31
32
33
34
35
36

#### 示例:自定义过滤器并调整顺序

假设我们需要自定义一个日志记录的过滤器,并将其放在 `UsernamePasswordAuthenticationFilter` 之前:

##### 1. 创建自定义过滤器

```java
import javax.servlet.FilterChain;
import javax.servlet.FilterConfig;
import javax.servlet.ServletException;
import javax.servlet.http.HttpFilter;
import javax.servlet.http.HttpServletRequest;
import javax.servlet.http.HttpServletResponse;
import java.io.IOException;

public class LoggingFilter extends HttpFilter {

    @Override
    public void init(FilterConfig filterConfig) throws ServletException {
        super.init(filterConfig);
        // 初始化代码
    }

    @Override
    protected void doFilter(HttpServletRequest request, HttpServletResponse response, FilterChain chain)
            throws IOException, ServletException {
        System.out.println("Request URI: " + request.getRequestURI());
        chain.doFilter(request, response);
    }

    @Override
    public void destroy() {
        // 清理代码
    }
}
2. 注册自定义过滤器并调整顺序 在 WebSecurityConfigurerAdapter 配置类中注册自定义过滤器:
1
2
3
4
5
6
7
8
9
10
11
12
13
14
15
16
17
18
19
20
21
22
23
24
25
26
import org.springframework.context.annotation.Configuration;import org.springframework.security.config.annotation.web.builders.HttpSecurity;import org.springframework.security.config.annotation.web.configuration.EnableWebSecurity;import org.springframework.security.config.annotation.web.configuration.WebSecurityConfigurerAdapter;import org.springframework.security.web.authentication.UsernamePasswordAuthenticationFilter;@Configuration @EnableWebSecurity public class SecurityConfig extends WebSecurityConfigurerAdapter { @Override protected void configure (HttpSecurity http) throws Exception { http .addFilterBefore(new LoggingFilter (), UsernamePasswordAuthenticationFilter.class) .authorizeRequests() .antMatchers("/public/**" ).permitAll() .anyRequest().authenticated() .and() .formLogin() .loginPage("/login" ) .permitAll() .and() .logout() .permitAll(); } }
查看过滤器链顺序 在开发和调试过程中,你可以启用 Spring Security 的调试日志,这样就能查看每个过滤器的执行顺序:
1 logging.level.org.springframework.security =DEBUG
可以在 application.properties 文件中添加上述配置。当你启动应用时,Spring Security 将打印每个过滤器的执行顺序,这有助于你确认自定义过滤器的位置是否正确。
总结 Spring Security 的过滤器链的顺序非常重要,因为每个过滤器依赖于前面的过滤器执行特定的功能,才能实现整体的安全控制。你可以通过 HttpSecurity 配置类来调整过滤器的顺序,并且可以使用调试日志来检查当前的过滤器链顺序。合理配置过滤器链顺序对于构建安全、高效的应用程序至关重要。
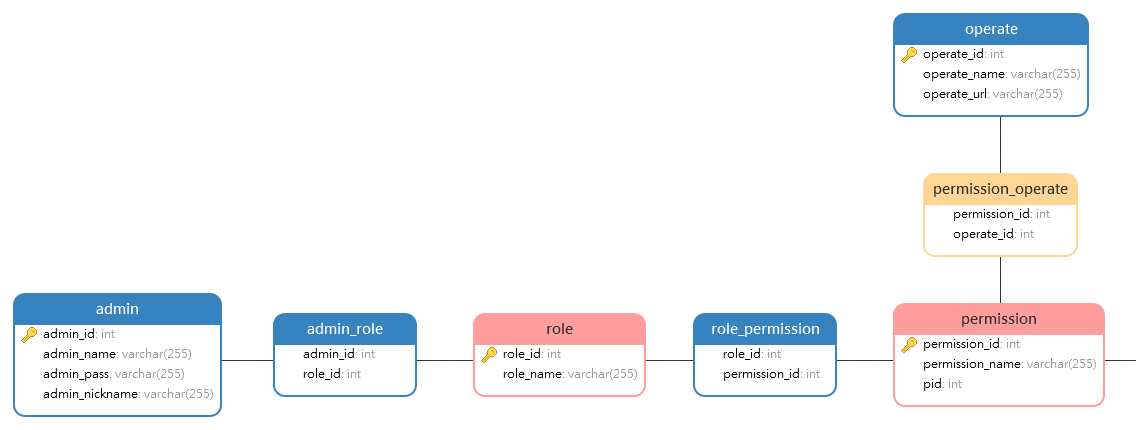
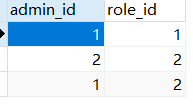
RBAC 权限模型 SpringSecurity:安全认证框架。包含:登录认证、权限授予、权限验证。
基于 “ 用户 => 角色 => 权限 ” 的 权限验证设计模型。
登录认证:用户模型
权限授予:权限授予角色模型
权限验证:登录的用户模型中的角色,是否含有权限授予的角色模型
securityConfig 1 2 3 4 5 6 7 8 9 10 11 12 13 14 15 16 17 18 19 20 21 22 23 24 @Configuration @EnableWebSecurity @EnableGlobalMethodSecurity(prePostEnabled = true) public class SecurityConfig extends WebSecurityConfigurerAdapter { ... http.headers().frameOptions().disable() .and() .csrf().disable() .exceptionHandling() .authenticationEntryPoint(customAuthenticationEntryPoint) .accessDeniedHandler(customAccessDeniedHandler) ...
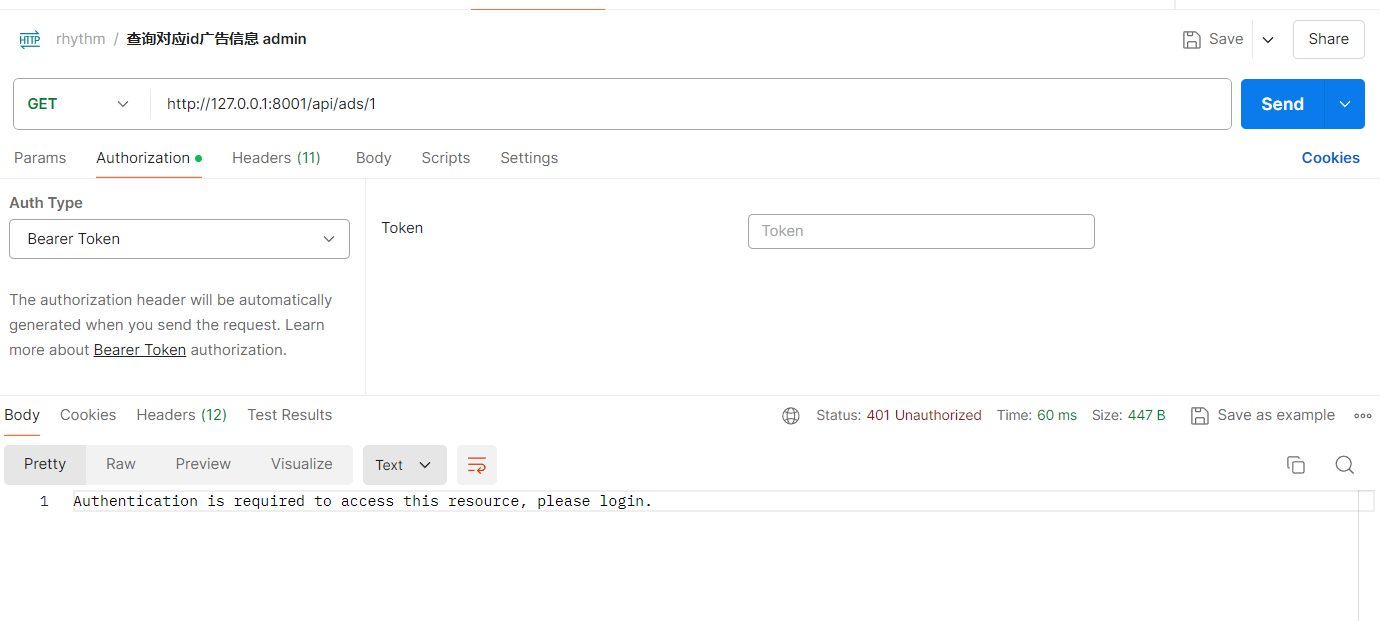
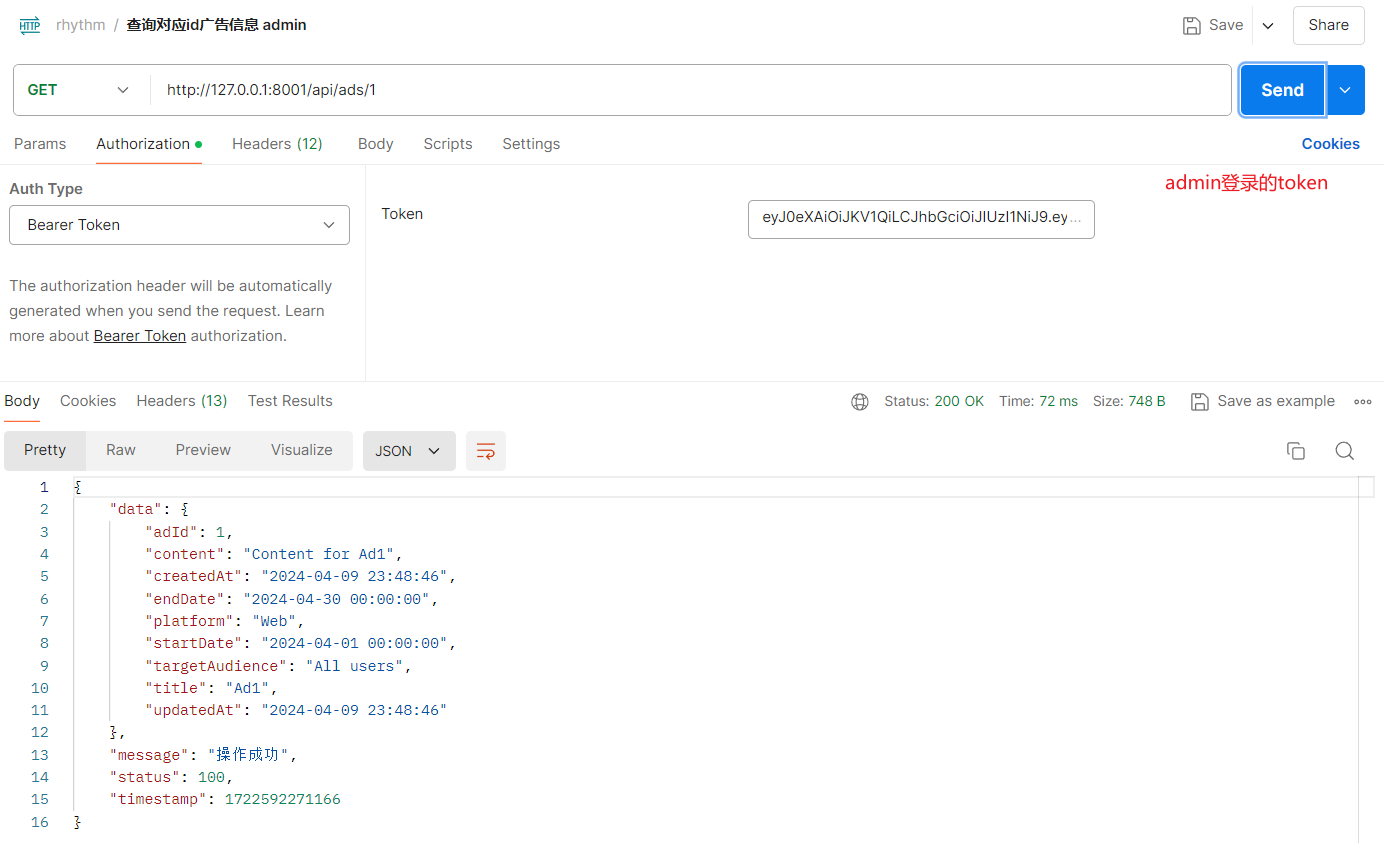
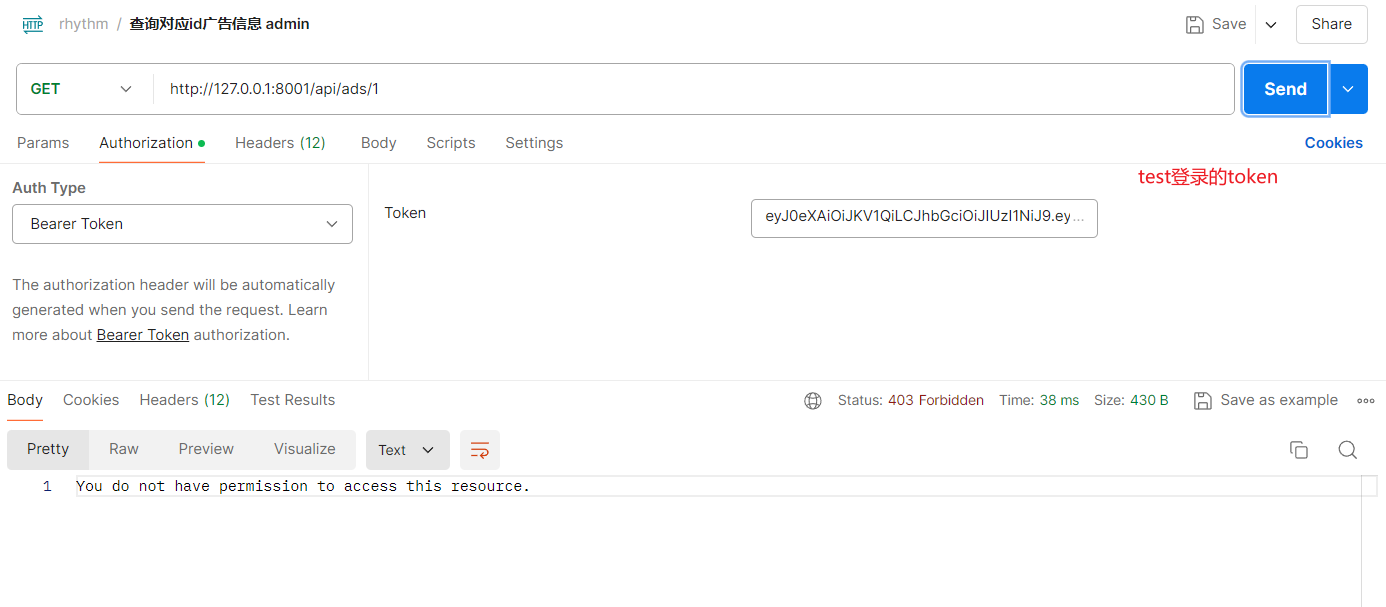
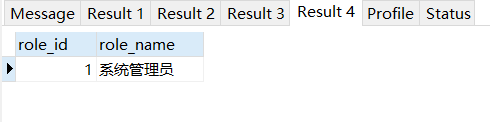
1 2 3 4 5 6 @PreAuthorize("hasRole('系统管理员')") @ResponseBody @ApiOperation("根据ad_id查询对应信息") @GetMapping("/ads/{ad_id}")
testCase
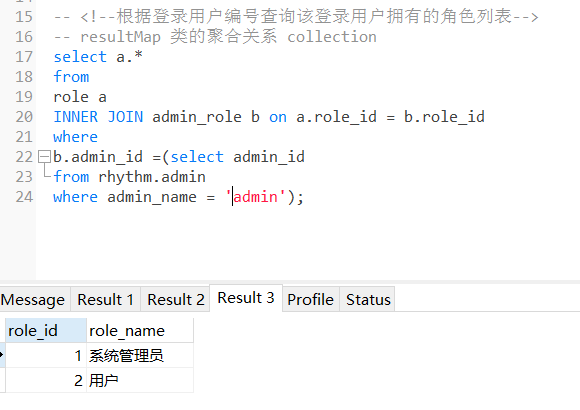
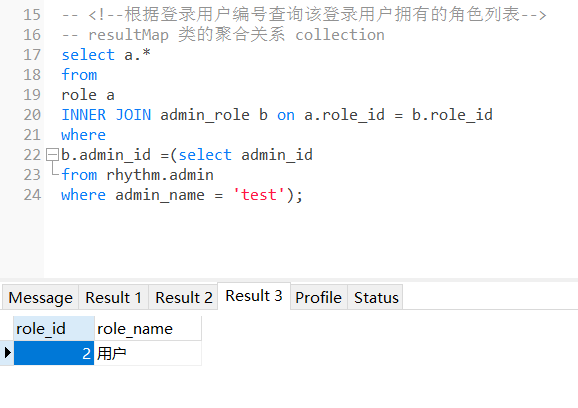
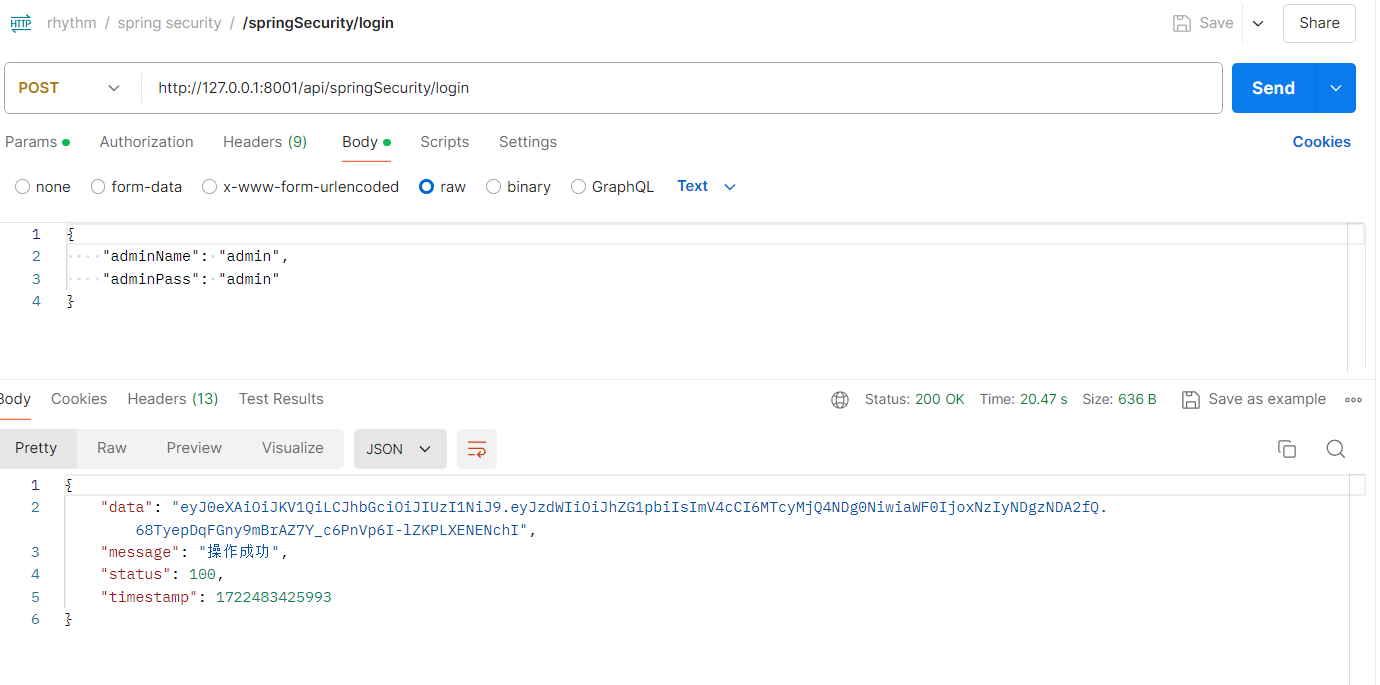
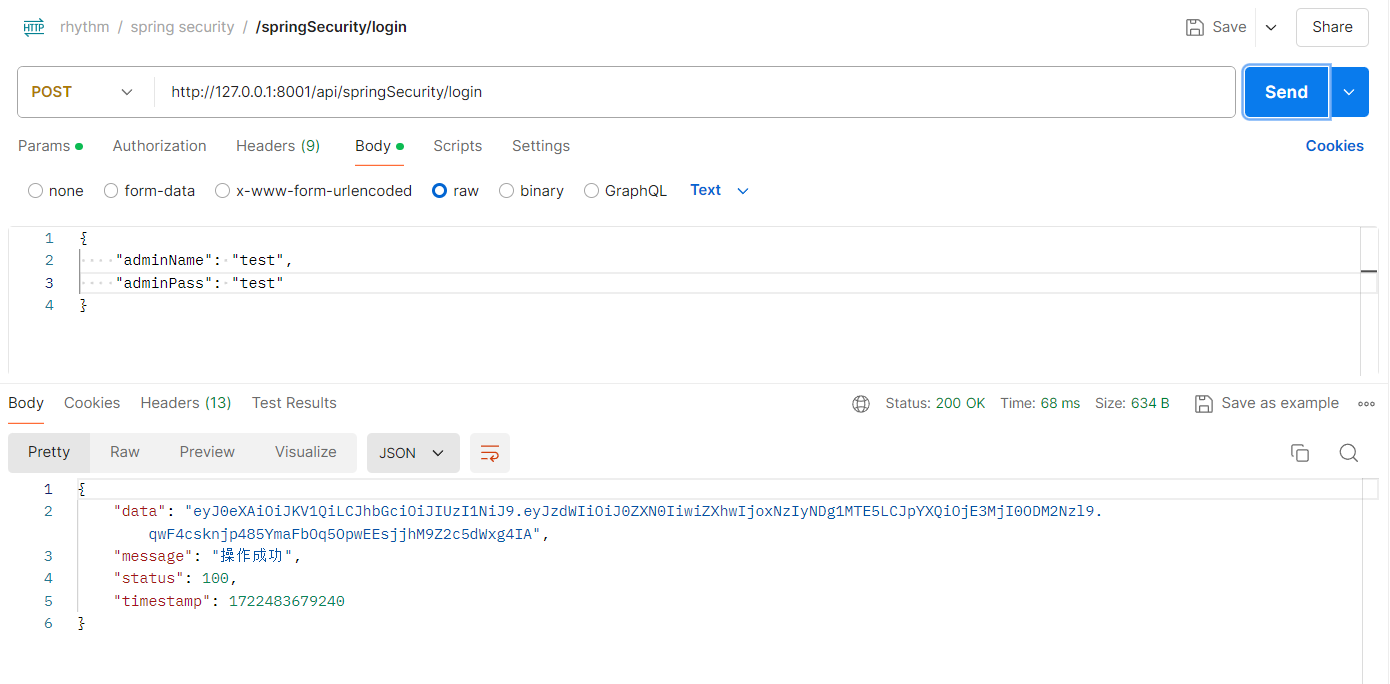
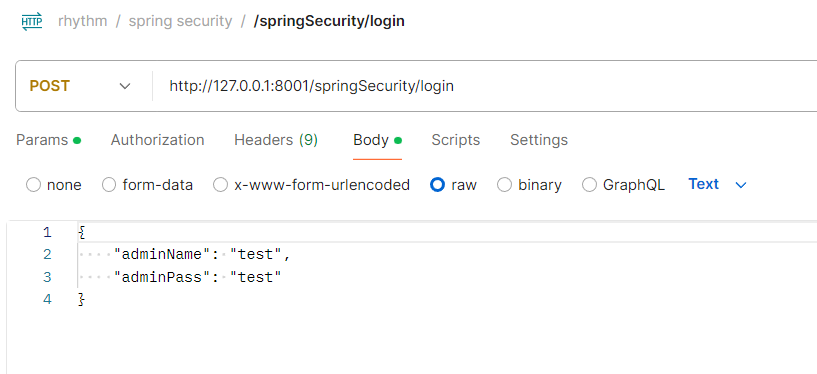
登录认证:用户模型 1 2 3 4 5 6 7 8 9 10 11 12 13 14 15 16 17 18 19 20 21 22 23 24 25 26 27 28 29 30 31 32 33 34 35 36 37 38 39 40 41 42 43 44 45 46 47 48 49 @PostMapping("/springSecurity/login") @ResponseBody public ResultData loginBySpringSecurity (@RequestBody AdminLoginBo adminLoginBo) { UsernamePasswordAuthenticationToken authRequest = new UsernamePasswordAuthenticationToken (username, password); Authentication authentication = authenticationManager.authenticate(authRequest); SecurityContextHolder.getContext().setAuthentication(authentication); ... String token = JwtTokenUtil.generateToken(username); redisUtil.set( "Bearer " + token , username , 60 * 24 ); if ( token == null ){ return ResultData.fail(500 ,"请登录" ); }else { return ResultData.success(token); } } public class JwtTokenUtil { private static final String SECRET_KEY = "" ; public static String generateToken (String username) { System.out.println("SECRET_KEY: " + SECRET_KEY); Algorithm algorithm = Algorithm.HMAC256(SECRET_KEY); return JWT.create() .withSubject(username) .withIssuedAt(new Date ()) .withExpiresAt(new Date (System.currentTimeMillis() + 1000 * 60 * 24 )) .sign(algorithm); }
权限授予:权限授予角色模型 基于方法的动态权限 (详见securityConfig)
1 2 3 4 5 6 @PreAuthorize("hasRole('系统管理员')") @ResponseBody @ApiOperation("根据ad_id查询对应信息") @GetMapping("/ads/{ad_id}")
权限验证:登录的用户模型中的角色,是否含有权限授予的角色模型 基于url路径的动态权限
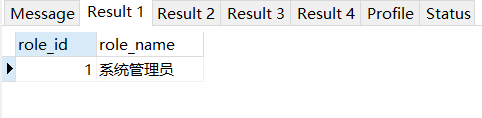
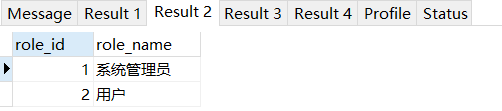
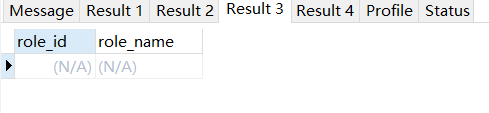
1 2 3 4 5 6 7 8 9 10 11 12 13 14 15 16 17 18 19 20 21 22 23 24 25 26 27 28 29 30 31 32 33 34 35 36 37 38 39 40 41 42 43 44 45 46 47 48 49 50 51 52 53 54 SELECT d.* FROM `operate` a INNER JOIN `permission_operate` b on a.operate_id = b.operate_idINNER JOIN `role_permission` c on b.permission_id = c.permission_idINNER JOIN `role` d on c.role_id = d.role_idWHERE a.operate_url = '/api/categories/add' ; SELECT d.* FROM `operate` a INNER JOIN `permission_operate` b on a.operate_id = b.operate_idINNER JOIN `role_permission` c on b.permission_id = c.permission_idINNER JOIN `role` d on c.role_id = d.role_idWHERE a.operate_url = '/api/music/add' ; SELECT d.* FROM `operate` a INNER JOIN `permission_operate` b on a.operate_id = b.operate_idINNER JOIN `role_permission` c on b.permission_id = c.permission_idINNER JOIN `role` d on c.role_id = d.role_idWHERE a.operate_url = '/api/user/1' ; SELECT d.* FROM `operate` a INNER JOIN `permission_operate` b on a.operate_id = b.operate_idINNER JOIN `role_permission` c on b.permission_id = c.permission_idINNER JOIN `role` d on c.role_id = d.role_idWHERE a.operate_url = '/api/categories/queryAll'
1 2 3 4 5 6 7 8 9 10 11 12 13 14 15 16 17 18 19 public class SecurityConfig extends WebSecurityConfigurerAdapter {... .withObjectPostProcessor(new ObjectPostProcessor <FilterSecurityInterceptor>() { @Override public <O extends FilterSecurityInterceptor > O postProcess (O o) { o.setSecurityMetadataSource(permissionAuthority); o.setAccessDecisionManager(permissionValid); return o; } }) ... }
首先自定义FilterInvocationSecurityMetadataSource 通过FilterInvocationSecurityMetadataSource接口中的getAttributes方法来确定一个请求需要哪些角色,
遍历过程中获取当前请求的URL所需要的角色信息并返回。如果当前请求的URL在资源表中不存在相应的模式,
1 2 3 4 5 6 7 8 9 10 11 12 13 14 15 16 17 18 19 20 21 22 23 24 25 26 27 28 29 30 31 32 33 34 35 36 37 38 39 40 41 42 @Component public class PermissionAuthority implements FilterInvocationSecurityMetadataSource { @Resource private RoleMapper roleMapper; @Override public Collection<ConfigAttribute> getAttributes (Object object) throws IllegalArgumentException { String requestUrl = ( (FilterInvocation) object ).getRequestUrl(); List<Role> roleList = roleMapper.getListByOperateUrl(requestUrl); if ( !roleList.isEmpty() && roleList.size() > 0 ){ String[] roles = new String [roleList.size()]; for ( int i = 0 ; i <= roles.length - 1 ; i++ ){ roles[i] = roleList.get(i).getRoleName(); } return SecurityConfig.createList(roles); } return SecurityConfig.createList("PublicPermission" ); } @Override public Collection<ConfigAttribute> getAllConfigAttributes () { return null ; } @Override public boolean supports (Class<?> clazz) { return FilterInvocation.class.isAssignableFrom(clazz); } }
PermissionValid implements AccessDecisionManager 当一个请求走完FilterInvocationSecurityMetadataSource中的getAttributes方法后,接下来就会来到AccessDecisionManager类中进行角色信息的比对,
重写decide方法,在该方法中判断当前登录的用户是否具备当前请求URL所需要的角色信息,如果不具备,就抛出AccessDeniedException异常,否则不做任何事即可
1 2 3 4 5 6 7 8 9 10 11 12 13 14 15 16 17 18 19 20 21 22 23 24 25 26 27 28 29 30 31 32 33 34 35 36 37 38 39 40 41 42 43 44 45 46 47 48 49 50 51 @Component public class PermissionValid implements AccessDecisionManager { @Override public void decide (Authentication authentication, Object object, Collection<ConfigAttribute> configAttributes) throws AccessDeniedException, InsufficientAuthenticationException { for ( ConfigAttribute attribute : configAttributes ){ if (authentication == null ) { throw new AccessDeniedException ("权限认证失败!" ); } String needRole = attribute.getAttribute(); System.out.println( "-------开始认证-------" ); if ("PublicPermission" .equals(needRole)) { if (authentication instanceof AnonymousAuthenticationToken) { throw new BadCredentialsException ("未登录" ); } else return ; } Collection<? extends GrantedAuthority > authorities = authentication.getAuthorities(); for (GrantedAuthority authority : authorities) { if (authority.getAuthority().equals(needRole)) { return ; } } } throw new AccessDeniedException ("权限认证失败!" ); } @Override public boolean supports (ConfigAttribute attribute) { return true ; } @Override public boolean supports (Class<?> clazz) { return true ; } }
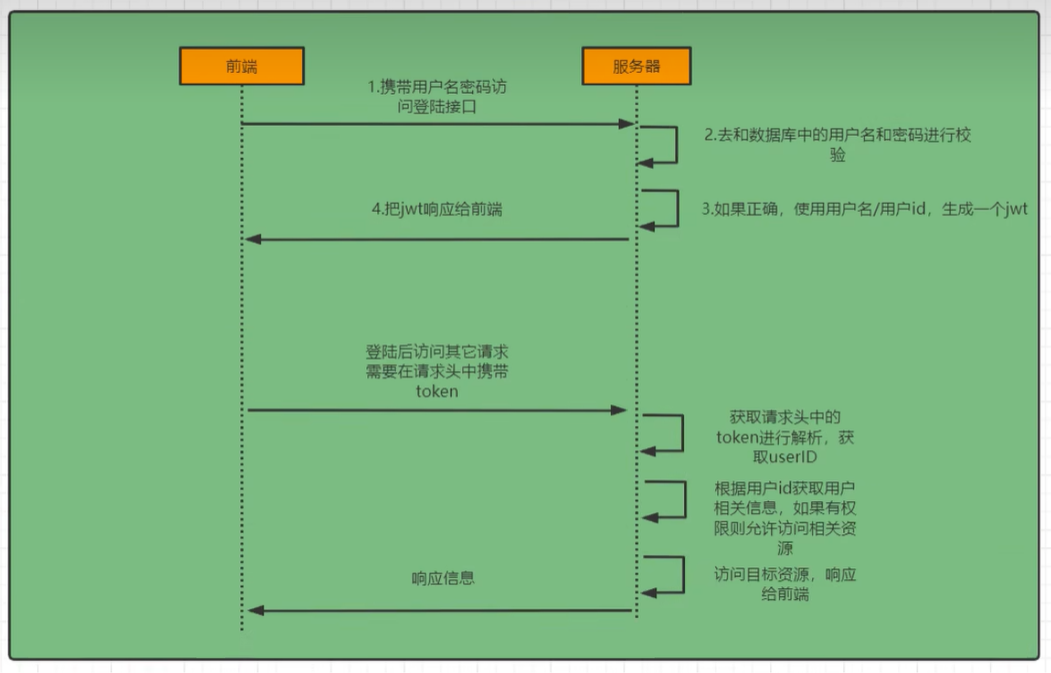
spring security 登录认证 权限认证 前后端分离 在前后端分离架构中,Spring Security的配置需要调整以支持基于JWT(JSON Web Token)的认证和授权。这种方式可以避免传统的会话(session)维护,通过前端携带JWT令牌进行后端API的访问和权限控制。
登录校验流程(用户密码认证生成认证信息):
http://127.0.0.1:8001/api/springSecurity/login
——-JwtRequestFilter, 开始jwt校验——- Ignoring filter for path: /api/springSecurity/login
——-PermissionAuthority implements FilterInvocationSecurityMetadataSource——-
——-PermissionValid implements AccessDecisionManager——-
————— 运行/springSecurity/login —————
1 2 Authentication authentication = authenticationManager.authenticate(authRequest); SecurityContextHolder.getContext().setAuthentication(authentication);
/springSecurity/login
SecurityContextHolder.getContext().setAuthentication(authentication); 确实是在登录时手动设置了认证对象。这个操作通常会在用户登录成功时进行,用于确保用户的认证信息正确保存到当前的安全上下文中。
不过,这样的设置主要是对一次请求有效。如果你想在前后端分离的场景下持久化状态,在每次请求中都自动完成认证、授权操作(即JwtRequestFilter.java),通常需要一个无状态的机制,如基于 JWT(JSON Web Token)的认证方式。
在用户成功登录后,通过 SecurityContextHolder.getContext().setAuthentication(authentication) 手动设置认证对象,这在仅当前请求中生效。这意味着,当请求结束时,安全上下文会被清空,认证信息不会自动传播到后续的请求中。
在前后端分离的场景中,如果你希望在后续的每个请求中都能自动进行认证,你需要使用无状态的认证机制,例如 JSON Web Token (JWT) 或者别的形式的令牌认证。这种机制通过在每个请求中携带令牌,后端过滤器拦截请求并验证令牌,从而恢复认证信息。
1 2 3 4 5 6 7 8 * 后端通过一个过滤器来拦截所有请求,验证 JWT 并解析其中的信息,然后将解析得到的 Authentication 对象保存到安全上下文中 * * 后端通过一个过滤器来拦截所有请求,验证 JWT 并恢复认证信息。
testCase
1 2 3 4 5 6 @PreAuthorize("hasRole('系统管理员')") @ResponseBody @ApiOperation("根据ad_id查询对应信息") @GetMapping("/ads/{ad_id}") http://127.0.0.1:8001/api/ads/1
1 2 3 4 5 6 @PreAuthorize("hasRole('用户')") @ResponseBody @ApiOperation("查询获取当前用户收藏的音乐") @GetMapping("/user/{user_id}") http://127.0.0.1:8001/api/user/1
jwt认证(jwt认证恢复认证信息)
SecurityContextHolder:上下文管理对象,用来在程序任何地方获取SecurityContext
SeucirtyContext:上下文对象,用来获取Authentication
Authentication:存储了认证信息,代表当前登录用户
Principal:用户信息,没有认证时一般是用户名,认证后一般是用户对象
Credentials:用户凭证,一般是密码
Authorities:用户权限
我们通过 SecurityContext 来获取Authentication,
[!CAUTION]
这种在一个线程中横跨若干方法调用,需要传递的对象,我们通常称之为上下文(Context)。上下文对象是非常有必要的,否则你每个方法都得额外增加一个参数接收对象,实在太麻烦了。
这个上下文对象则是交由 SecurityContextHolder 进行管理,
SecurityContextHolder源码原理非常简单,就是和我们之前实现的上下文对象一样,使用ThreadLocal来保证一个线程中传递同一个对象
在用户成功登录后,通过 SecurityContextHolder.getContext().setAuthentication(authentication) 手动设置认证对象,这在仅当前请求中生效。这意味着,当请求结束时,安全上下文会被清空,认证信息不会自动传播到后续的请求中。
在前后端分离的场景中,如果你希望在后续的每个请求中都能自动进行认证,你需要使用无状态的认证机制,例如 JSON Web Token (JWT) 或者别的形式的令牌认证。这种机制通过在每个请求中携带令牌,后端过滤器拦截请求并验证令牌,从而恢复认证信息。
1 2 3 4 5 6 7 * 后端通过一个过滤器来拦截所有请求,验证 JWT 并解析其中的信息,然后将解析得到的 Authentication 对象保存到安全上下文中 * * 后端通过一个过滤器来拦截所有请求,验证 JWT 并恢复认证信息。
在 JWT 认证中,用户首次登录依然需要用户名和密码,但之后的请求只需提供 JWT ,因为 JWT 包含了足够的用户身份信息(如用户 ID 和权限),可以通过解析和验证恢复用户认证状态。
具体步骤:
最小化差异 :在生成 JWT 时,只包含必要的信息,如用户 ID、用户名和权限。在验证 JWT 时,使用这些信息重新构建一个 Authentication 对象。使用 UserDetailsService :在验证 JWT 后,可以使用 UserDetailsService 重新加载完整的用户信息,以确保信息的一致性和最新性。定期刷新 :实施 JWT 刷新机制,定期更新 JWT,以确保信息的时效性。
基于会话 :使用会话 ID 从服务器存储中恢复用户信息,适合简单的单体应用。基于 JWT :每个请求包含 JWT,通过解析和验证 JWT 恢复用户信息,适用于复杂的分布式系统,不需要服务器端存储会话信息。
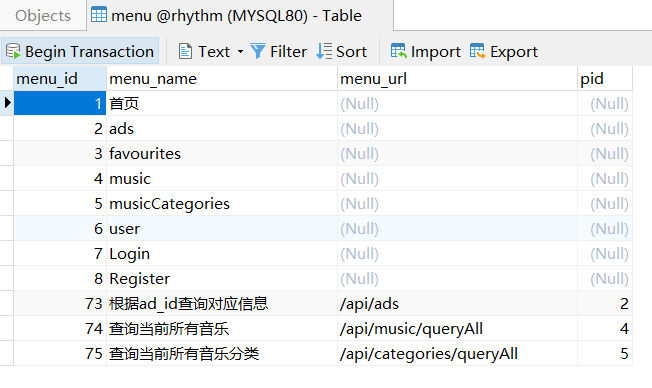
动态加载用户菜单
用户菜单就是用户登录成功后首页显示的菜单。这个菜单数据是根据用户的角色动态加载的,即不同预设角色的用户登录成功后看到的菜单不同。
1 2 3 4 5 6 7 8 9 10 11 12 13 14 15 16 17 18 19 20 21 22 23 24 25 26 27 28 29 30 31 32 33 34 35 36 37 38 39 40 41 42 43 44 45 46 47 48 49 50 51 52 53 54 55 56 57 58 59 60 61 62 63 64 65 66 67 68 69 70 71 72 73 74 75 76 77 78 79 @TableName(value ="admin") @Data public class Admin implements Serializable , UserDetails { @TableId(type = IdType.AUTO) private Integer adminId; private String adminName; private String adminPass; private String adminNickname; @TableField(exist = false) private static final long serialVersionUID = 1L ; private List<Role> roleList; private List<Menu> menuList; @Override public Collection<? extends GrantedAuthority > getAuthorities() { return getRoleList(); } @Override public String getPassword () { return getAdminPass(); } @Override public String getUsername () { return getAdminName(); } @Override public boolean isAccountNonExpired () { return true ; } @Override public boolean isAccountNonLocked () { return true ; } @Override public boolean isCredentialsNonExpired () { return true ; } @Override public boolean isEnabled () { return true ; } }
1 2 3 4 5 6 7 8 9 10 11 12 13 @Mapper public interface AdminMapper extends BaseMapper <Admin> { Admin getOneWithRolelistMenulistByName (String username) ; }
1 2 3 4 5 6 7 8 9 10 11 12 13 14 15 16 17 18 19 20 21 22 23 24 25 26 27 28 29 30 31 32 33 34 35 36 37 38 39 40 41 42 43 44 45 46 47 <?xml version="1.0" encoding="UTF-8" ?> <!DOCTYPE mapper PUBLIC "-//mybatis.org//DTD Mapper 3.0//EN" "http://mybatis.org/dtd/mybatis-3-mapper.dtd" > <mapper namespace ="com.test.mapper.AdminMapper" > <resultMap id ="BaseResultMap" type ="com.test.bean.po.Admin" > <id property ="adminId" column ="admin_id" jdbcType ="INTEGER" /> <result property ="adminName" column ="admin_name" jdbcType ="VARCHAR" /> <result property ="adminPass" column ="admin_pass" jdbcType ="VARCHAR" /> <result property ="adminNickname" column ="admin_nickname" jdbcType ="VARCHAR" /> </resultMap > <resultMap id ="AdminWithRoleResultMap" type ="com.test.bean.po.Admin" > <id property ="adminId" column ="admin_id" jdbcType ="INTEGER" /> <result property ="adminName" column ="admin_name" jdbcType ="VARCHAR" /> <result property ="adminPass" column ="admin_pass" jdbcType ="VARCHAR" /> <result property ="adminNickname" column ="admin_nickname" jdbcType ="VARCHAR" /> <collection property ="roleList" ofType ="com.test.bean.po.Role" column ="admin_id" select ="com.test.mapper.RoleMapper.selectListByAdminId" /> </resultMap > <resultMap id ="AdminWithRoleAndMenuResultMap" type ="com.test.bean.po.Admin" extends ="AdminWithRoleResultMap" > <collection property ="menuList" ofType ="com.test.bean.po.Menu" column ="admin_id" select ="com.test.mapper.MenuMapper.selectListByAdminId" /> </resultMap > <sql id ="Base_Column_List" > admin_id,admin_name,admin_pass, admin_nickname </sql > <select id ="getOneWithRolelistMenulistByName" resultMap ="AdminWithRoleAndMenuResultMap" > select * from rhythm.admin where admin_name =#{username} </select > </mapper >
1 2 3 4 5 6 7 8 9 10 11 12 13 14 15 16 17 18 19 20 21 22 23 24 25 26 27 28 29 30 @Service public class AdminServiceImpl extends ServiceImpl <AdminMapper, Admin> implements AdminService { @Resource private AdminMapper adminMapper; @Autowired private PasswordEncoder passwordEncoder; @Override public UserDetails loadUserByUsername (String username) throws UsernameNotFoundException { System.out.println("开始查询数据库... " ); Admin admin = adminMapper.getOneWithRolelistMenulistByName( username ); System.out.println("根据username查询到的用户账号信息: " + admin); if ( admin == null ){ System.out.println("账户名称或密码错误!请重新填写!" ); throw new UsernameNotFoundException ("账户名称或密码错误!请重新填写!" ); } return admin; } }
1 2 3 4 5 6 7 8 9 10 11 12 13 14 15 16 17 18 19 20 21 22 23 24 25 26 27 28 29 30 31 @Component public class JwtRequestFilter extends OncePerRequestFilter { ... UserDetails userDetails = this .adminService.loadUserByUsername(username); UsernamePasswordAuthenticationToken usernamePasswordAuthenticationToken = new UsernamePasswordAuthenticationToken ( userDetails, null , adminService.loadUserByUsername(username).getAuthorities()); usernamePasswordAuthenticationToken.setDetails(new WebAuthenticationDetailsSource ().buildDetails(request)); SecurityContextHolder.getContext().setAuthentication(usernamePasswordAuthenticationToken); ... }
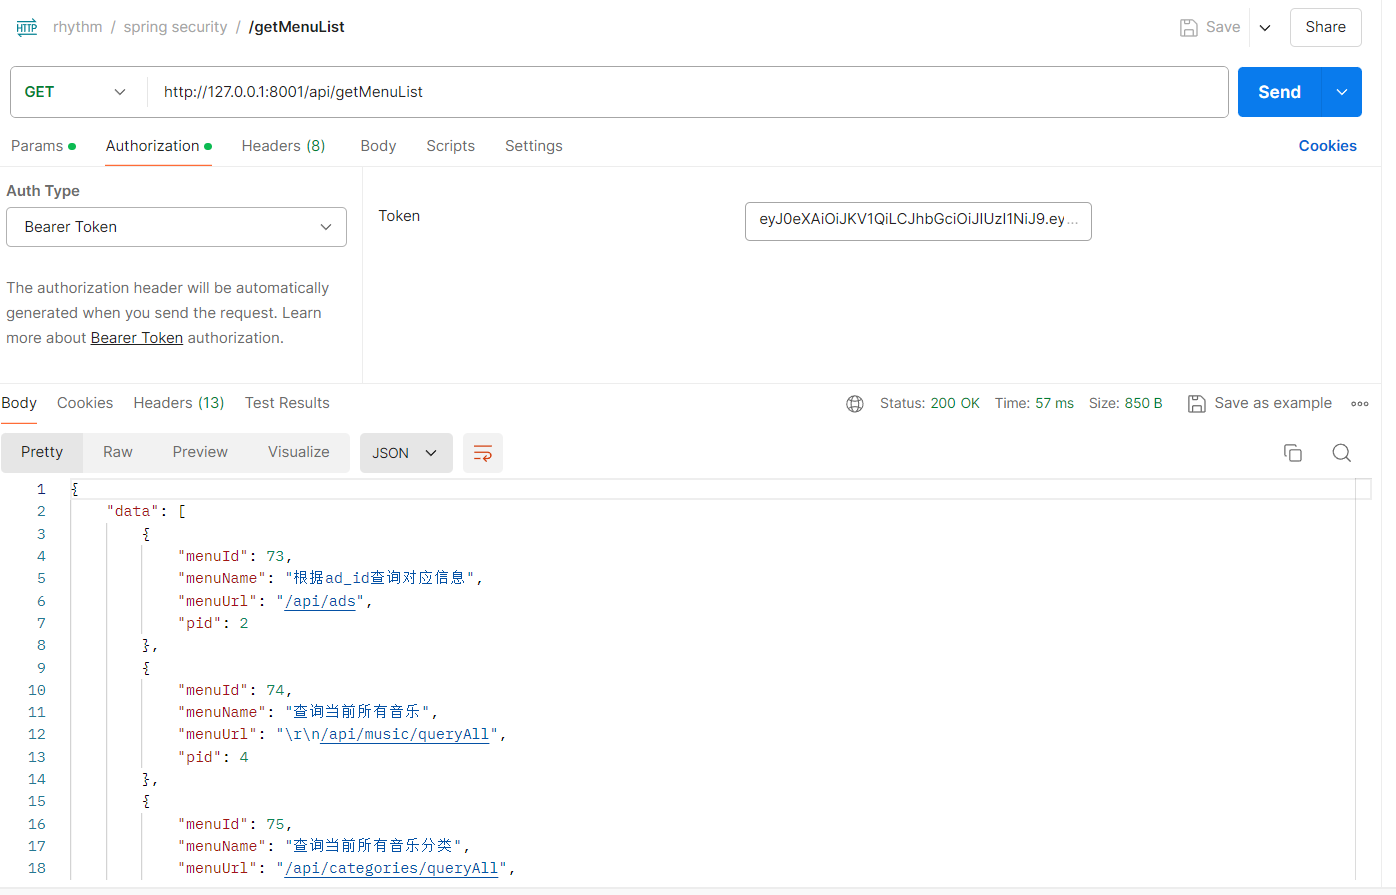
1 2 3 4 5 6 7 8 9 10 11 12 13 @GetMapping( value = {"/getMenuList"} ) @ResponseBody @ApiOperation("返回 当前登录用户 登录认证authentication信息") public ResultData getMenuList ( Authentication authentication ) { System.out.println( "Authentication = " + authentication); Admin admin = (Admin) authentication.getPrincipal(); System.out.println( "admin = " + admin); return ResultData.success(((Admin) authentication.getPrincipal()).getMenuList()); }
参考: https://www.cnblogs.com/meer/p/17652916.html
https://zhuanlan.zhihu.com/p/342755411?utm_medium=social&utm_oi=1343915562263547904
https://zhuanlan.zhihu.com/p/342746910
https://zhuanlan.zhihu.com/p/342744060
相关问题 There was an unexpected error (type=Internal Server Error, status=500). Request method ‘POST’ not supported 1 2 3 4 5 .and() .csrf() .disable() .exceptionHandling() .accessDeniedHandler(permissionErrorHandle);
默认情况下,Spring Security 启用 CSRF 保护。此处禁用了 CSRF 保护(虽然不推荐),为了保持安全性,请在生产环境启用 CSRF 保护并正确配置 CSRF 令牌。
There is no PasswordEncoder mapped for the id “null”
确保所有的密码编码和解码使用同一个 BCryptPasswordEncoder 实例
1 2 3 4 5 6 7 8 9 10 .inMemoryAuthentication() .withUser("user" ) .password(new BCryptPasswordEncoder ().encode("user" )) .roles("USER" ) .and() .withUser("admin" ) .password(new BCryptPasswordEncoder ().encode("admin_password" )) .roles("ADMIN" );
1 2 3 4 5 6 7 8 9 10 11 12 13 14 15 16 17 .inMemoryAuthentication() .withUser("user" ) .password(passwordEncoder().encode("user" )) .roles("USER" ) .and() .withUser("admin" ) .password(passwordEncoder().encode("admin_password" )) .roles("ADMIN" ); } @Bean public PasswordEncoder passwordEncoder () { return new BCryptPasswordEncoder (); }
org.thymeleaf.exceptions.TemplateInputException: Error resolving template [hello], template might not exist or might not be accessible by any of the configured Template Resolvers
1 2 3 4 5 6 @Controller @GetMapping("/hello") public String hello () { return "hello" ; }
1 2 3 4 5 6 7 @Controller @GetMapping("/hello") @ResponseBody public String hello () { return "hello" ; }
过滤器 拦截器 public class PerformanceFilter implements Filter {
public class PerformanceInterceptor implements HandlerInterceptor {
过滤器(Filters)和拦截器(Interceptors)是 Java Web 开发中常用的两种机制,用于在请求到达控制器之前或响应返回客户端之前进行预处理或后处理。虽然它们都可以用于类似的目的,但在实现机制和应用场景上有所不同。
过滤器(Filters) 过滤器是 Servlet API 的一部分,主要用于对 HTTP 请求和响应进行预处理和后处理。过滤器可以拦截和修改请求和响应,但不会修改实际的控制器处理逻辑。
使用场景
检查或修改请求参数
进行身份验证和授权
记录日志
数据压缩或加密
示例代码 下面是一个简单的过滤器,它记录每个请求的处理时间:
1 2 3 4 5 6 7 8 9 10 11 12 13 14 15 16 17 18 19 20 21 22 23 24 25 26 27 28 29 30 31 import javax.servlet.Filter;import javax.servlet.FilterChain;import javax.servlet.FilterConfig;import javax.servlet.ServletException;import javax.servlet.ServletRequest;import javax.servlet.ServletResponse;import javax.servlet.annotation.WebFilter;import java.io.IOException;@WebFilter(urlPatterns = "/*") public class PerformanceFilter implements Filter { @Override public void init (FilterConfig filterConfig) throws ServletException { } @Override public void doFilter (ServletRequest request, ServletResponse response, FilterChain chain) throws IOException, ServletException { long startTime = System.currentTimeMillis(); chain.doFilter(request, response); long endTime = System.currentTimeMillis(); System.out.println("Request processed in " + (endTime - startTime) + " ms" ); } @Override public void destroy () { } }
配置 可以使用 @WebFilter 注解或在 web.xml 文件中配置过滤器。上面的例子使用的是 @WebFilter 注解。
拦截器(Interceptors) 拦截器通常是框架(如 Spring MVC)提供的机制,不是 Servlet API 的一部分。它用于在控制器方法调用之前和之后进行处理。拦截器比过滤器更强大,可以访问更多的信息,如控制器方法参数,返回值等。
使用场景
用户认证和授权
日志记录和分析
统一异常处理
数据格式转换
示例代码 以下是一个简单的 Spring MVC 拦截器,用于记录每个请求的处理时间:
1 2 3 4 5 6 7 8 9 10 11 12 13 14 15 16 17 18 19 20 21 22 23 24 25 26 27 import org.springframework.web.servlet.HandlerInterceptor;import org.springframework.web.servlet.ModelAndView;import javax.servlet.http.HttpServletRequest;import javax.servlet.http.HttpServletResponse;public class PerformanceInterceptor implements HandlerInterceptor { @Override public boolean preHandle (HttpServletRequest request, HttpServletResponse response, Object handler) throws Exception { request.setAttribute("startTime" , System.currentTimeMillis()); return true ; } @Override public void postHandle (HttpServletRequest request, HttpServletResponse response, Object handler, ModelAndView modelAndView) throws Exception { long startTime = (Long) request.getAttribute("startTime" ); long endTime = System.currentTimeMillis(); System.out.println("Request processed in " + (endTime - startTime) + " ms" ); } @Override public void afterCompletion (HttpServletRequest request, HttpServletResponse response, Object handler, Exception ex) throws Exception { } }
配置 在 Spring MVC 中,你需要将拦截器注册到 WebMvcConfigurer:
1 2 3 4 5 6 7 8 9 10 11 12 import org.springframework.context.annotation.Configuration;import org.springframework.web.servlet.config.annotation.InterceptorRegistry;import org.springframework.web.servlet.config.annotation.WebMvcConfigurer;@Configuration public class WebConfig implements WebMvcConfigurer { @Override public void addInterceptors (InterceptorRegistry registry) { registry.addInterceptor(new PerformanceInterceptor ()).addPathPatterns("/**" ); } }
主要区别
实现机制 :
过滤器 是 Servlet API 的一部分,可以应用于所有的 Servlet 请求。拦截器 通常是框架(如 Spring MVC)提供的功能,主要用于控制器方法的调用。
使用范围 :
过滤器 可以应用于整个应用程序,无论是静态资源还是动态请求。拦截器 通常只处理控制器方法的请求。
访问权限 :
过滤器 只能访问请求和响应对象,无法访问控制器方法的参数和返回值。拦截器 可以访问控制器方法的参数和返回值,具有更高的灵活性。
配置方式 :
过滤器 可以在 web.xml 文件中配置,也可以使用注解。拦截器 需要在框架配置文件中注册或使用代码进行配置。
总结 过滤器和拦截器都是预处理和后处理请求的有效机制,各有优缺点和适用的场景。在选择使用哪种机制时,可以根据需要处理的内容和应用程序的具体需求来选择。通常,过滤器适用于全局请求处理,而拦截器更适用于控制器级别的请求处理。
spring security 使用的过滤器还是拦截器 Spring Security 是一个强大的安全框架,用于保护 Java 应用程序。它主要使用过滤器(Filters)来实现安全功能,而不是拦截器(Interceptors)。不过,它也提供了一些拦截器扩展功能,可以在某些场景下与 Spring MVC 拦截器配合使用。
Spring Security 的过滤器 Spring Security 主要通过一系列的过滤器来处理安全性。这些过滤器被组织成一个过滤器链,这个链会在每个 HTTP 请求到达实际处理代码之前进行处理。常见的过滤器有:
**SecurityContextPersistenceFilter**:管理 SecurityContext 的生命周期。
**UsernamePasswordAuthenticationFilter**:处理基于表单的登录。
**BasicAuthenticationFilter**:处理 HTTP 基本认证。
**ExceptionTranslationFilter**:捕获安全异常,将其转化为符合客户端期望的响应。
**FilterSecurityInterceptor**:最终进行访问控制决策。
配置 Spring Security 过滤器链 Spring Security 的过滤器链默认通过 DelegatingFilterProxy 进行配置,通常可以在 Spring 的配置类中自定义和扩展。
XML 配置 如果你使用 XML 配置,可以通过 web.xml 配置 DelegatingFilterProxy:
1 2 3 4 5 6 7 8 9 10 11 12 13 14 15 16 17 18 19 20 21 <filter > <filter-name > springSecurityFilterChain</filter-name > <filter-class > org.springframework.web.filter.DelegatingFilterProxy</filter-class > </filter > <filter-mapping > <filter-name > springSecurityFilterChain</filter-name > <url-pattern > /*</url-pattern > </filter-mapping > <beans:beans xmlns ="http://www.springframework.org/schema/security" xmlns:beans ="http://www.springframework.org/schema/beans" xmlns:xsi ="http://www.w3.org/2001/XMLSchema-instance" xsi:schemaLocation ="http://www.springframework.org/schema/security http://www.springframework.org/schema/security/spring-security.xsd http://www.springframework.org/schema/beans http://www.springframework.org/schema/beans/spring-beans.xsd" > <http > </http > </beans:beans >
Java 配置 使用 Java 配置,通过继承 WebSecurityConfigurerAdapter 并重写其方法来自定义安全配置:
1 2 3 4 5 6 7 8 9 10 11 12 13 14 15 16 17 18 19 20 21 22 23 24 25 import org.springframework.context.annotation.Bean;import org.springframework.context.annotation.Configuration;import org.springframework.security.config.annotation.web.builders.HttpSecurity;import org.springframework.security.config.annotation.web.configuration.EnableWebSecurity;import org.springframework.security.config.annotation.web.configuration.WebSecurityConfigurerAdapter;@Configuration @EnableWebSecurity public class SecurityConfig extends WebSecurityConfigurerAdapter { @Override protected void configure (HttpSecurity http) throws Exception { http .authorizeRequests() .antMatchers("/public/**" ).permitAll() .anyRequest().authenticated() .and() .formLogin() .loginPage("/login" ) .permitAll() .and() .logout() .permitAll(); } }
Spring Security 拦截器 Spring Security 也提供了对拦截器的支持,比如方法级别的安全性(Method Security),可以通过注解来实现,如 @PreAuthorize 和 @PostAuthorize。
方法级别安全配置 ####### 启用方法级别的安全性
通过在配置类中启用方法级别的安全性:
1 2 3 4 5 6 7 8 import org.springframework.context.annotation.Configuration;import org.springframework.security.config.annotation.method.configuration.EnableGlobalMethodSecurity;@Configuration @EnableGlobalMethodSecurity(prePostEnabled = true) public class MethodSecurityConfig { }
####### 使用注解进行方法级别的安全控制
1 2 3 4 5 6 7 8 9 10 11 12 13 14 15 16 import org.springframework.security.access.prepost.PreAuthorize;import org.springframework.stereotype.Service;@Service public class MyService { @PreAuthorize("hasRole('ROLE_USER')") public void userMethod () { } @PreAuthorize("hasRole('ROLE_ADMIN')") public void adminMethod () { } }
主要区别
使用场景 :
过滤器 :Spring Security 主要使用过滤器来处理整体的请求/响应安全。拦截器 :拦截器主要用于更多细粒度的控制,如方法级别的安全性。
实现机制 :
过滤器 :是 Servlet 规范的一部分,负责在请求进入和响应离开 Web 容器时进行处理。拦截器 :通常是通过框架提供的机制实现,如 Spring MVC 的HandlerInterceptor。
配置方式 :
过滤器 :通过 DelegatingFilterProxy 和 springSecurityFilterChain 进行配置。拦截器 :通过注解 @EnableGlobalMethodSecurity 和相关安全注解进行配置。
总结 Spring Security 主要通过过滤器链实现请求和响应的安全处理,但也提供了方法级别的安全控制支持,允许你通过拦截器和注解来进行细粒度的安全控制。过滤器用于全局的 HTTP 请求安全管理,而拦截器则用于更具体的方法级别的权限控制。
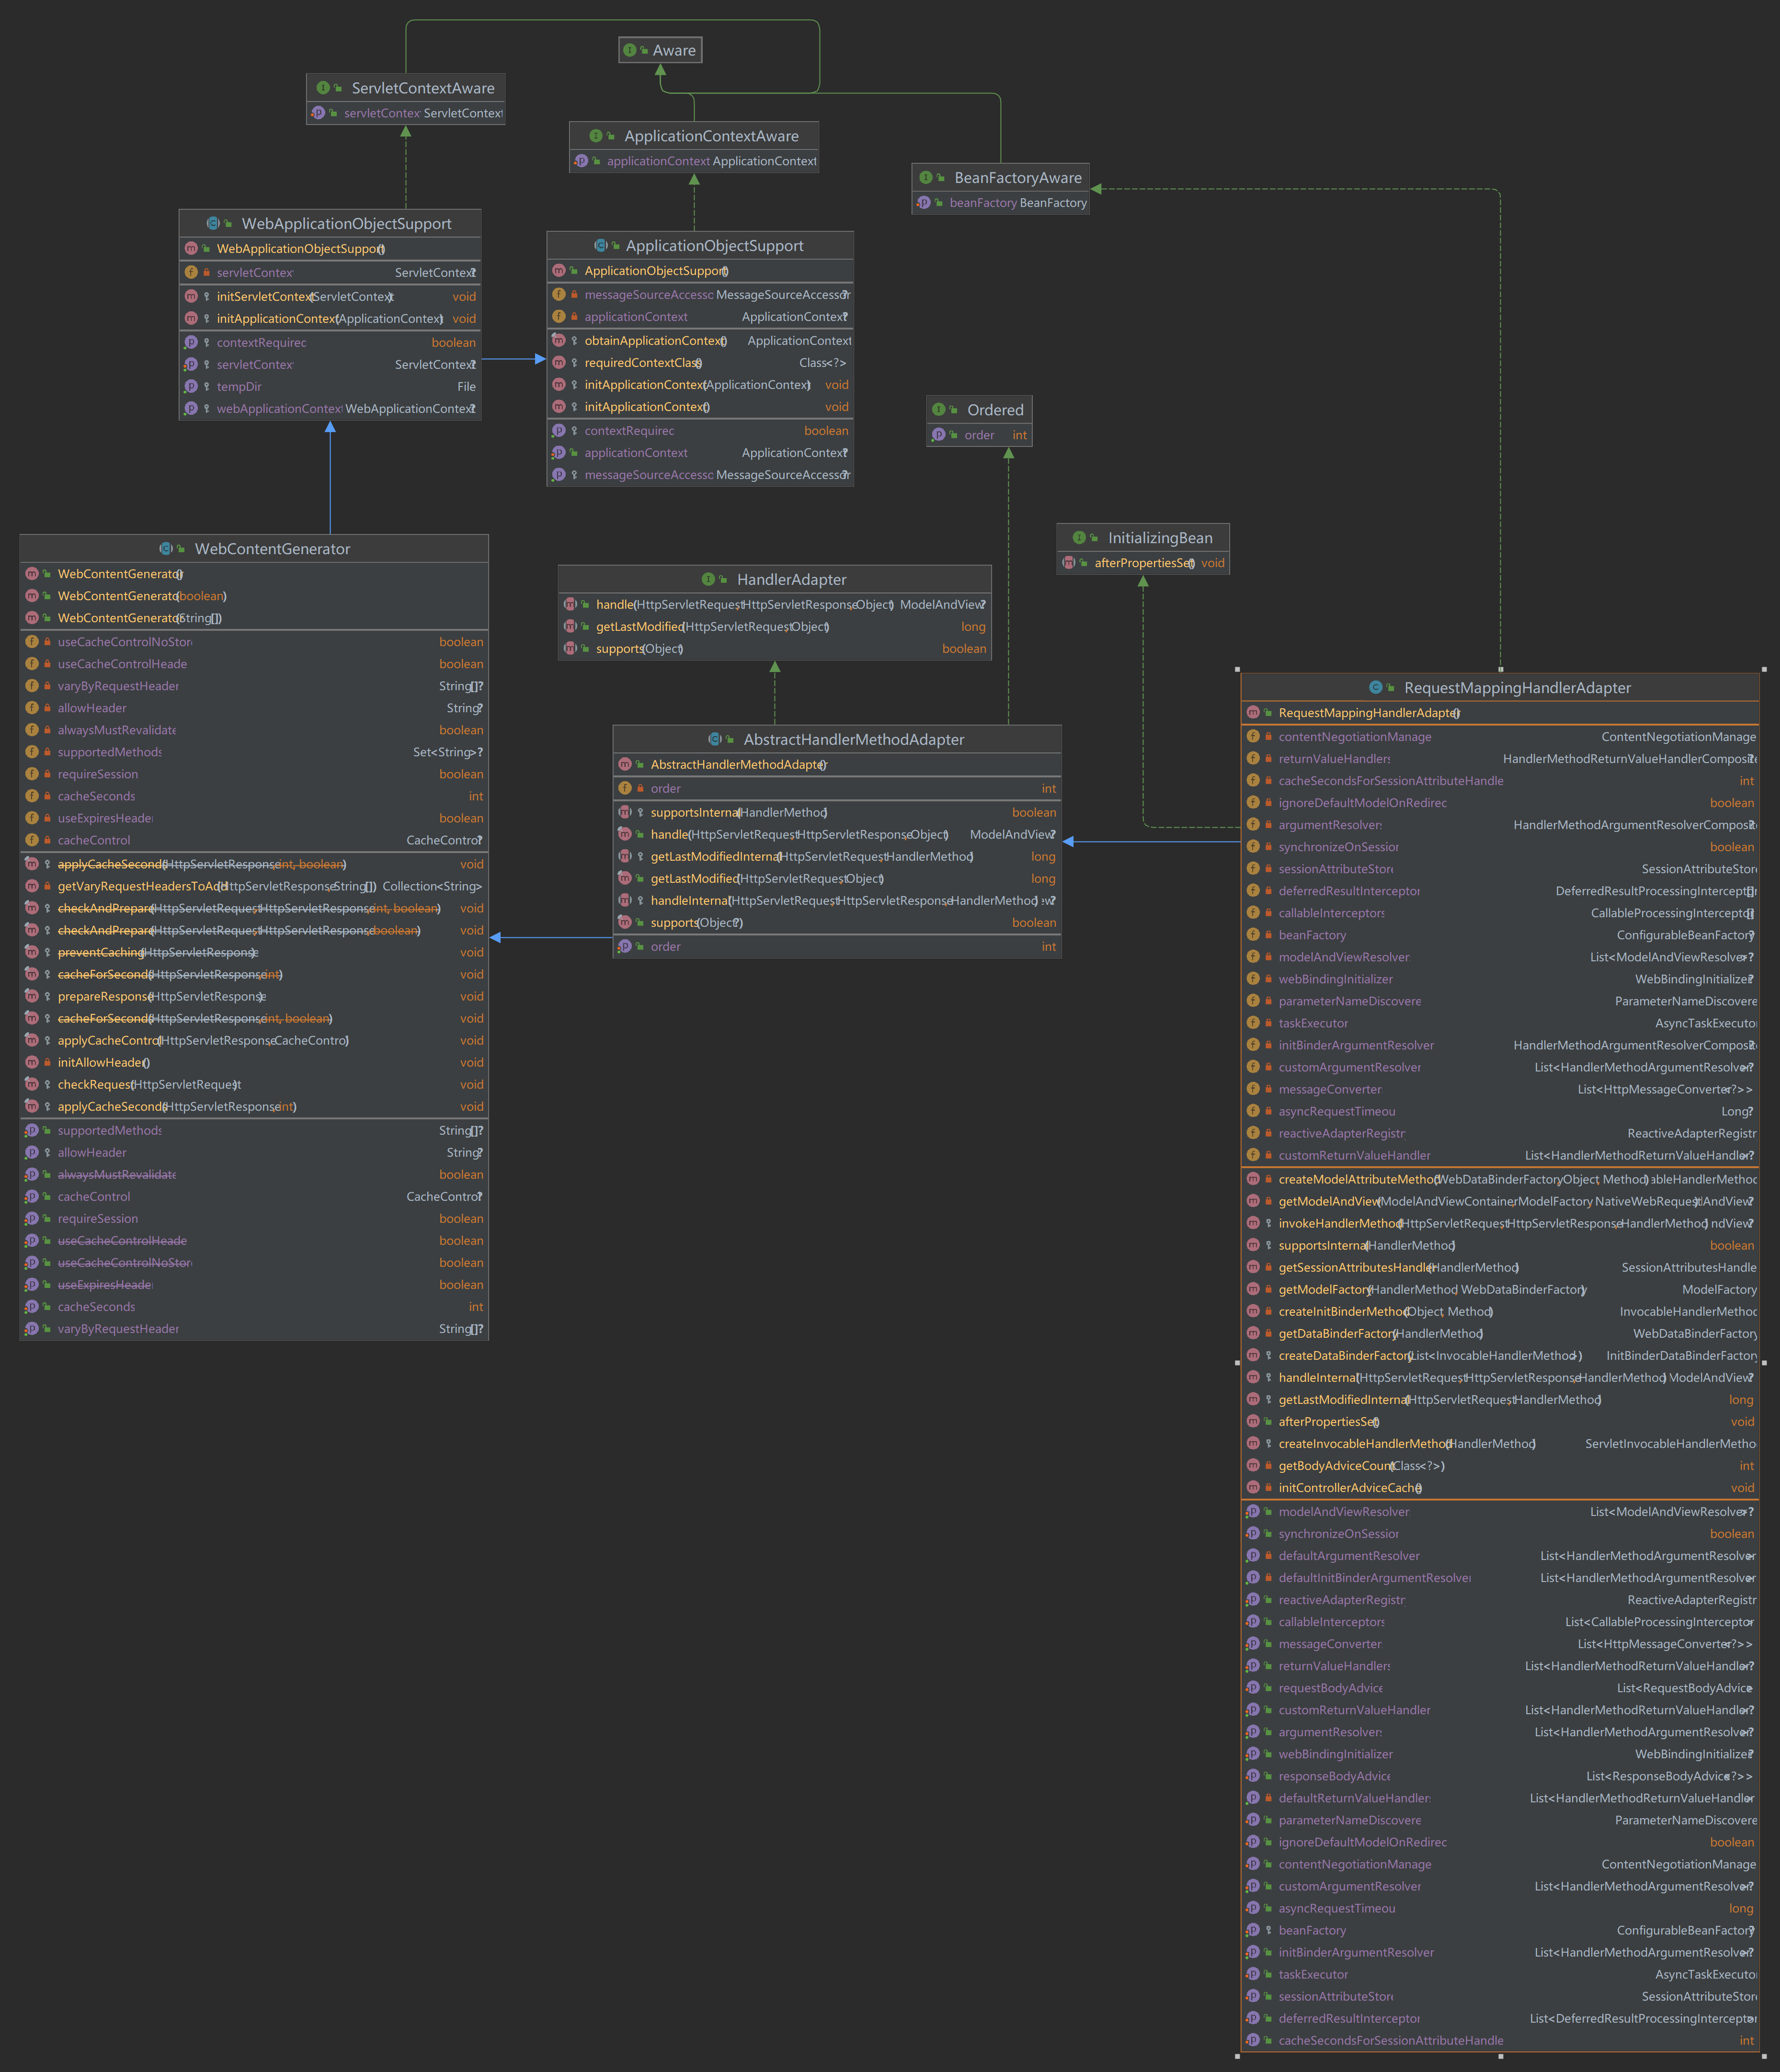
handler 与 (handler)adapter 是一样的吗 静态代理 动态代理 不,Handler 和 Adapter 在Spring MVC框架中是不一样的概念,各自扮演不同的角色。具体来说:
Handler(处理器) 定义 Handler是负责处理HTTP请求的对象,它包含了具体的业务逻辑。这是MVC架构中的Controller或其他类,它处理用户请求并生成相应的响应。
例子 在Spring MVC中,最常见的Handler是带有@Controller和@RequestMapping注解的类或方法:
1 2 3 4 5 6 7 8 9 10 11 12 13 import org.springframework.stereotype.Controller;import org.springframework.web.bind.annotation.RequestMapping;import org.springframework.web.bind.annotation.ResponseBody;@Controller public class MyController { @RequestMapping("/hello") @ResponseBody public String handleRequest () { return "Hello, World!" ; } }
这里的MyController类中的handleRequest方法就是一个Handler。
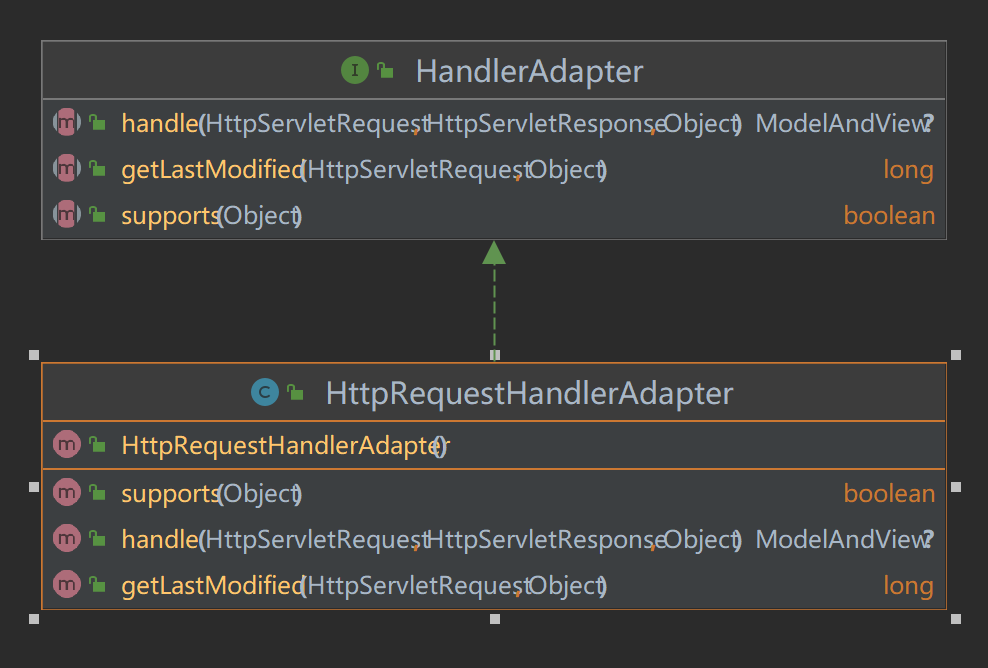
(handler)Adapter(适配器) 定义 Adapter(处理器适配器)是一个接口,它的职责是将各种不同类型的Handler适配到Spring MVC的处理流程中,用于解耦DispatcherServlet和实际执行请求的Handler。HandlerAdapter负责调用具体的Handler方法,并处理其返回值。
例子 Spring MVC提供了多种内置的HandlerAdapter,如RequestMappingHandlerAdapter用于@RequestMapping注解的方法,HttpRequestHandlerAdapter用于HttpRequestHandler接口的实现类。
1 2 3 4 5 6 7 8 9 10 11 12 13 14 15 16 17 18 19 20 21 22 23 24 25 import org.springframework.web.servlet.HandlerAdapter;import org.springframework.web.servlet.ModelAndView;import javax.servlet.http.HttpServletRequest;import javax.servlet.http.HttpServletResponse;public class CustomHandlerAdapter implements HandlerAdapter { @Override public boolean supports (Object handler) { return handler instanceof CustomHandler; } @Override public ModelAndView handle (HttpServletRequest request, HttpServletResponse response, Object handler) throws Exception { CustomHandler customHandler = (CustomHandler) handler; String viewName = customHandler.handleRequest(request, response); return new ModelAndView (viewName); } @Override public long getLastModified (HttpServletRequest request, Object handler) { return -1 ; } }
核心区别
职责不同 :
Handler :负责处理具体的HTTP请求并生成响应。HandlerAdapter :负责将Handler适配到Spring MVC的标准处理流程中,处理Handler的调用和返回值。
层次不同 :
Handler 是业务逻辑层的一部分,具体执行和响应请求。HandlerAdapter 是框架层的一部分,帮助DispatcherServlet调用Handler。
方式不同 :
Handler 可以是任何符合业务需求的Java对象,如Controller类。HandlerAdapter 通常是Spring框架内置的,也可以自行实现以自定义执行逻辑。
工作流程 (servlet 9大组件) (servlet 9大类)
( DispatcherServlet - HandlerMapping - HandlerAdapter - ViewResolver )
收到请求 :DispatcherServlet接收到一个HTTP请求。查找处理器 :通过HandlerMapping找到这个请求要处理的Handler。选择适配器 :
DispatcherServlet查找一个合适的HandlerAdapter来适配找到的Handler。
调用处理器 :
HandlerAdapter调用Handler的具体业务方法,生成处理结果(如ModelAndView对象)。
视图渲染 :
DispatcherServlet使用ViewResolver解析视图并渲染,最终返回HTTP响应。
总结
Handler :具体处理HTTP请求的组件,包含业务逻辑。HandlerAdapter :适配器,负责将不同类型的Handler适配到统一的处理流程中,并调用Handler的方法。
它们在职责、层次和实现方式上都有所不同,但共同协作完成Spring MVC的请求处理工作。通过理解这两者的区别,可以更好地理解Spring MVC的工作机制,并根据需要进行扩展和自定义。
处理器适配器(HandlerAdapter)、静态代理和动态代理在Spring框架中都有其各自的用例和应用方式。下面将详细解释这些概念并展示它们的示例。
HandlerAdapter HandlerAdapter 是Spring MVC框架中的一个接口,它用于将HTTP请求映射到具体的处理器方法。处理器适配器使得DispatcherServlet可以调用不同类型的处理器(如控制器、HttpRequestHandlers等)。
示例 1 2 3 4 5 6 7 8 9 10 11 12 13 14 15 16 17 18 19 20 21 22 23 24 25 26 27 28 29 30 31 import org.springframework.web.servlet.HandlerAdapter;import org.springframework.web.servlet.ModelAndView;import javax.servlet.http.HttpServletRequest;import javax.servlet.http.HttpServletResponse;public class MyCustomHandlerAdapter implements HandlerAdapter { @Override public boolean supports (Object handler) { return handler instanceof MyCustomHandler; } @Override public ModelAndView handle (HttpServletRequest request, HttpServletResponse response, Object handler) throws Exception { MyCustomHandler myHandler = (MyCustomHandler) handler; String viewName = myHandler.handleRequest(request, response); return new ModelAndView (viewName); } @Override public long getLastModified (HttpServletRequest request, Object handler) { return -1 ; } } class MyCustomHandler { public String handleRequest (HttpServletRequest request, HttpServletResponse response) { return "customView" ; } }
静态代理 静态代理是指由程序员创建或通过工具生成代理类的方式。在静态代理中,代理类与委托类在编译时就已经确定。静态代理主要被用于横切关注点(如日志记录、权限检查等)。
示例 1 2 3 4 5 6 7 8 9 10 11 12 13 14 15 16 17 18 19 20 21 22 23 24 25 26 27 28 29 30 31 32 33 34 interface GreetingService { void sayHello () ; } class GreetingServiceImpl implements GreetingService { @Override public void sayHello () { System.out.println("Hello, World!" ); } } *-------------------------------------------* class GreetingServiceProxy implements GreetingService { private GreetingServiceImpl greetingService; public GreetingServiceProxy (GreetingServiceImpl greetingService) { this .greetingService = greetingService; } @Override public void sayHello () { System.out.println("Before execution" ); greetingService.sayHello(); System.out.println("After execution" ); } } public class StaticProxyDemo { public static void main (String[] args) { GreetingService service = new GreetingServiceProxy (new GreetingServiceImpl ()); service.sayHello(); } }
动态代理 动态代理是指代理类在运行时创建的。这使得我们可以在运行时指定行为,而不需要提前知道具体的代理类。Java中的动态代理通常使用java.lang.reflect.Proxy和InvocationHandler接口。
示例 1 2 3 4 5 6 7 8 9 10 11 12 13 14 15 16 17 18 19 20 21 22 23 24 25 26 27 28 29 30 31 32 33 34 35 36 37 38 39 40 41 42 43 44 import java.lang.reflect.InvocationHandler;import java.lang.reflect.Method;import java.lang.reflect.Proxy;interface GreetingService { void sayHello () ; } class GreetingServiceImpl implements GreetingService { @Override public void sayHello () { System.out.println("Hello, World!" ); } } *-------------------------------------------* class GreetingServiceInvocationHandler implements InvocationHandler { private Object target; public GreetingServiceInvocationHandler (Object target) { this .target = target; } @Override public Object invoke (Object proxy, Method method, Object[] args) throws Throwable { System.out.println("Before execution" ); Object result = method.invoke(target, args); System.out.println("After execution" ); return result; } } public class DynamicProxyDemo { public static void main (String[] args) { GreetingService target = new GreetingServiceImpl (); GreetingService proxy = (GreetingService) Proxy.newProxyInstance( target.getClass().getClassLoader(), target.getClass().getInterfaces(), new GreetingServiceInvocationHandler (target) ); proxy.sayHello(); } }
对比和总结
相似点:
都是为了增强或适配某种功能
都在原有代码和新功能之间起到了桥梁作用
不同点:
Handler Adapter 主要用于适配不同类型的处理器,使其能够被 DispatcherServlet 统一调用
代理模式(无论是静态还是动态)主要用于在不修改原有代码的情况下,增加新的功能或控制对原有功能的访问
在 Spring 中的应用:
Handler Adapter 主要用于 Spring MVC 的请求处理流程
代理模式在 Spring 中广泛应用,特别是在 AOP(面向切面编程)中。Spring 使用动态代理来实现诸如事务管理、日志记录等横切关注点
HandlerAdapter :用于Spring MVC框架中,帮助将HTTP请求映射到具体的处理器方法。主要用于MVC的请求处理流程。静态代理 :在编译时固定的代理类,通过实现同样的接口或继承同样的类来创建。主要用于提前知道的场景,添加横切关注点。动态代理 :在运行时创建的代理类,通常使用Java反射机制。主要用于不确定具体代理类,或需要在运行时动态处理方法调用的场景。
总的来说,Handler Adapter 更多地是一种设计模式的应用(适配器模式),而代理模式(包括静态代理和动态代理)则是一种更通用的设计模式,在 Spring 框架中有着更广泛的应用。通过理解这些概念及其应用场景,开发者可以更好地利用Spring框架及其强大的扩展机制来实现复杂的业务需求。
动态代理在Spring MVC中的应用 在Spring MVC中,可以使用动态代理来增强HandlerAdapter的功能,比如在请求处理前后添加自定义逻辑。下面是一个示例,展示如何使用动态代理来增强HandlerAdapter。
1. 定义一个HandlerAdapter的动态代理处理器 : 1 2 3 4 5 6 7 8 9 10 11 12 13 14 15 16 17 18 19 20 21 22 23 24 25 26 27 28 29 30 31 import java.lang.reflect.InvocationHandler;import java.lang.reflect.Method;public class HandlerAdapterProxy implements InvocationHandler { private final Object target; public HandlerAdapterProxy (Object target) { this .target = target; } @Override public Object invoke (Object proxy, Method method, Object[] args) throws Throwable { if ("handle" .equals(method.getName())) { HttpServletRequest request = (HttpServletRequest) args[0 ]; HttpServletResponse response = (HttpServletResponse) args[1 ]; Object handler = args[2 ]; System.out.println("Before handling request" ); Object result = method.invoke(target, args); System.out.println("After handling request" ); return result; } else { return method.invoke(target, args); } } }
2. 创建代理实例并使用它 : 假设我们有一个自定义的HandlerAdapter:
1 2 3 4 5 6 7 8 9 10 11 12 13 14 15 16 17 18 19 20 21 22 23 ==> request ==handlerMapping ==> handlerAdapter(CustomHandlerAdapter) ==> resolverView import org.springframework.web.servlet.HandlerAdapter;import org.springframework.web.servlet.ModelAndView;public class CustomHandlerAdapter implements HandlerAdapter { @Override public boolean supports (Object handler) { return handler instanceof MyCustomHandler; } @Override public ModelAndView handle (HttpServletRequest request, HttpServletResponse response, Object handler) { return new ModelAndView ("customView" ); } @Override public long getLastModified (HttpServletRequest request, Object handler) { return -1 ; } }
3. **配置DispatcherServlet来使用代理HandlerAdapter**: 1 2 3 4 5 6 7 8 9 10 11 12 13 14 15 16 17 import org.springframework.context.annotation.Bean;import org.springframework.context.annotation.Configuration;import java.lang.reflect.Proxy;@Configuration public class WebConfig { @Bean public HandlerAdapter customHandlerAdapter () { CustomHandlerAdapter originalAdapter = new CustomHandlerAdapter (); return (HandlerAdapter) Proxy.newProxyInstance( originalAdapter.getClass().getClassLoader(), new Class []{HandlerAdapter.class}, new HandlerAdapterProxy (originalAdapter) ); } }
通过这样的配置,Spring MVC会在处理请求时使用增强后的处理器适配器,能够在请求处理前后执行额外的逻辑。这展示了如何利用动态代理来增强Spring组件的功能。
静态代理在编译时确定并生成代理类,适合较简单的情况。动态代理在运行时生成代理类,灵活性更高,适合需要在运行时动态添加行为的情况。在Spring MVC中,通过HandlerAdapter和动态代理,可以实现强大的请求处理逻辑定制。